Showing posts with label Cayman. Show all posts

Tuesday, December 26, 2017

2006 Porsche Cayman S 80k mile review


I bought this Cayman S in 2014 and wrote an article about the buying experience and first impressions.  Recently this car hit 80k miles (actually just under but close enough) so I would I would write a review of what it has been like since I bought it.  This is my second Porsche.  The first was a 1987 944S.  This car is a huge upgrade in every way.  This is the best car I have owned, especially from a driver engagement perspective.  When you first get in you already know you are in a very special car.  Often when I am at the gas station filling up I get compliments on the car.  When you start up the flat 6 in the morning it rumbles for a bit as the catalyst warm-up strategy makes for a lopey idle that sounds great.  I have done just a couple minor modifications, 2 of which improved the engine sound.  The first was to replace the restrictive exhaust outlet.  The second was removing the baffles from the air box and installing a K&N filter.  Now you can really hear the sweet induction sound which is hard to describe with words.  I drive the car daily as long as there is no salt on the roads (which takes out most of the winter).  I also give it proper exercise by doing a few track days each year.  On the street you find that you don't even need to brake where you would with mortal cars.  The cars ability to effortlessly change directions is pure magic.

The Good

Pretty much everything!  
  • World class leading handling.  Confidence inspiring.  I can't properly describe the feel of this car in words.  You must drive one to understand (not recommended unless you are ready to buy one).  It feels more like a streetable race car then a raceable street car.  
  • Awesome looks.  You can see both form and function in this design.
  • Mid-engine behind driver design.  Did I mention how well this handles!
  • Great engine.  Sound is amazing and power is also good.  Sure, I could always make use of more power but I don't find myself pining away for it.  As you hold the throttle open you can hear the cams phase and open up the flow.  When you upshift at redline you get this incredible wail that reminds me of the F1 cars in the V8 days.  
  • Comfortable seats.  I have the standard seats (versus the sport) and even these are great.  Its easy to get in and out yet they still hold you well at the track.  
  • Practical spaces to carry stuff.  With 2 trunks you actually have good space to carry stuff for a sports car.  
  • Excellent dash and gauges.  All the info you need at a glance.  The analog speedo is a bit less useful but the tach and display are perfect.  
  • Great interior.
  • The ride is spot on.  A bit firm on rough roads and it could use a bit more firmness on the track but this is a great middle ground.  Its firm but not jarring on rough Midwest roads yet still great at the track.  I don't have the active shocks (PASM) and that would likely improve this even more at the track.
  • General ergonomics.  Everything is where it belongs and is intuitive to use.  
  • Very simple to change brake pads.  With fixed calipers you just pull a pin and the pads come right out.  This is more important when you tack it as you change pads often.  
  • I can comfortably fit with a helmet on.
  • The seats go low enough.  In most cars it feels like you sit far too high.  This one lets you lower the seat down where it should be.
  • Great automatic HVAC.  Automatic HVAC systems are not created equal.  This one however works very well.  I set it and forget it.  
  • Sport Chrono sport mode.  My car has the Sport Chrono system.  While I don't really use the timer, part of this feature in this car is a sport mode for the engine and traction control.  This makes the throttle response crisper, changes to a hard rev limit, and relaxes the traction control nannies so you can have more fun while still not crashing.  
  • You don't have to waste money making your engine look good because nobody can see it anyway.  It runs and sounds fantastic and that is what really counts.
  • Fuel economy.  Around town I often get over 20mph even with my lead foot and short drives.  At the track I can go 4 sessions on a tank of fuel which is great.  The highway fuel economy is less good, around 26mpg.  If this car had a 7th gear it would likely do well over 30mpg.  At 75mph it is running at 3,000rpm.  Fuel economy is certainly not the focus of this car.

Gripes

This is a short list of minor whining.
  • Every other car now feels less good.  The bar has been raised very high and other cars that you once really liked are now below the bar.  
  • Crankcase breather issue.  Occasionally at the track it will carry oil over into the intake.  At times this causes smoke on start up.  I have only had this happen a few times and only at the track.  I may have overfilled it as well.  There is a motorsports breather available that fixes this.   
  • I cannot reset the oil change reminder without buying expensive tools.  
  • A weak battery can cause the body control to reset to factory defaults.  You have to go to the dealer to get features re-enabled.  Never let the battery get run down.  Keep a maintainer on it when storing.  Keep a fresh battery in it.
  • No radiator grilles.  There are many fixes for this.  Mine is in this article: https://jimroal.blogspot.com/2015/05/porsche-cayman-s-grilles.html

Maintenance & Repairs

Overall this is a very reliable and durable car.  I don't drive it easy either.  It is also surprisingly easy to work on.
  • Tires.  Since I do track days its rare tires make it 15k miles.  Nothing wrong with the car here.  Cost of the tires are actually what I consider reasonable.  I can get the top of the line Michelin Pilot Super Sports for under $1k.  I have the 18" rims.  For the track more negative camber is needed and you should also set the toe to 0.  I did a crude adjustment and the tires now wear better at the track.
  • Brakes.  Like tires, brakes will go fast if you do track days.  Good pads for this car cost about $200 per axle set (or $400 all around).  Again, these are good pads.  I'm sure you can find cheaper pads but never try to save money on brakes by going with poor quality.  I generally use Hawk pads.  I do have a street set and a different set for track.  More on brakes here.
  • Oil & filter.  This is very simple to do at home.  I back the car up on ramps.  The filter and drain plug are right next to each other.  It takes 8.5 quarts of Mobile One 0W-40.  Oil change costs about $80 to do at home.
  • Spark plugs.  When I first got this car I thought engine access would be a challenge but really it is not.  Changing the plugs involves removing the rear wheels and a small plastic panel.  After you do that you can easily see all the coils.  Its not hard at all.  
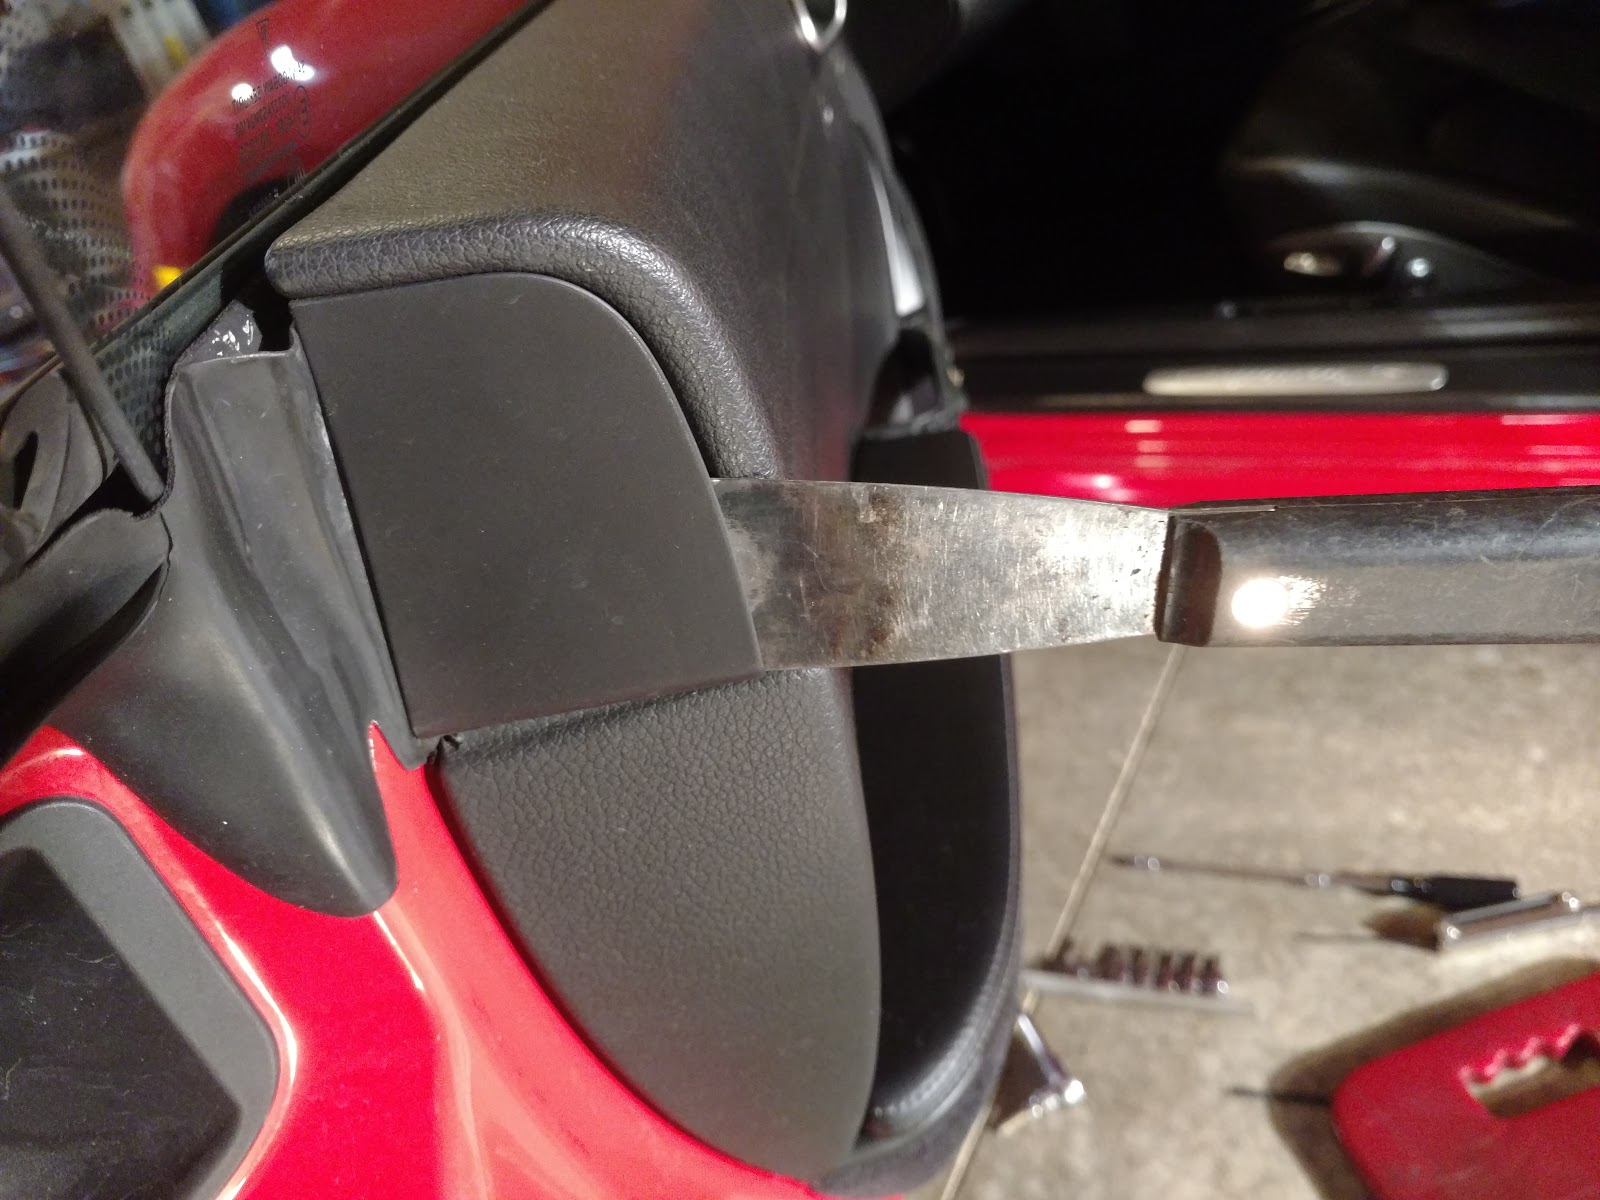
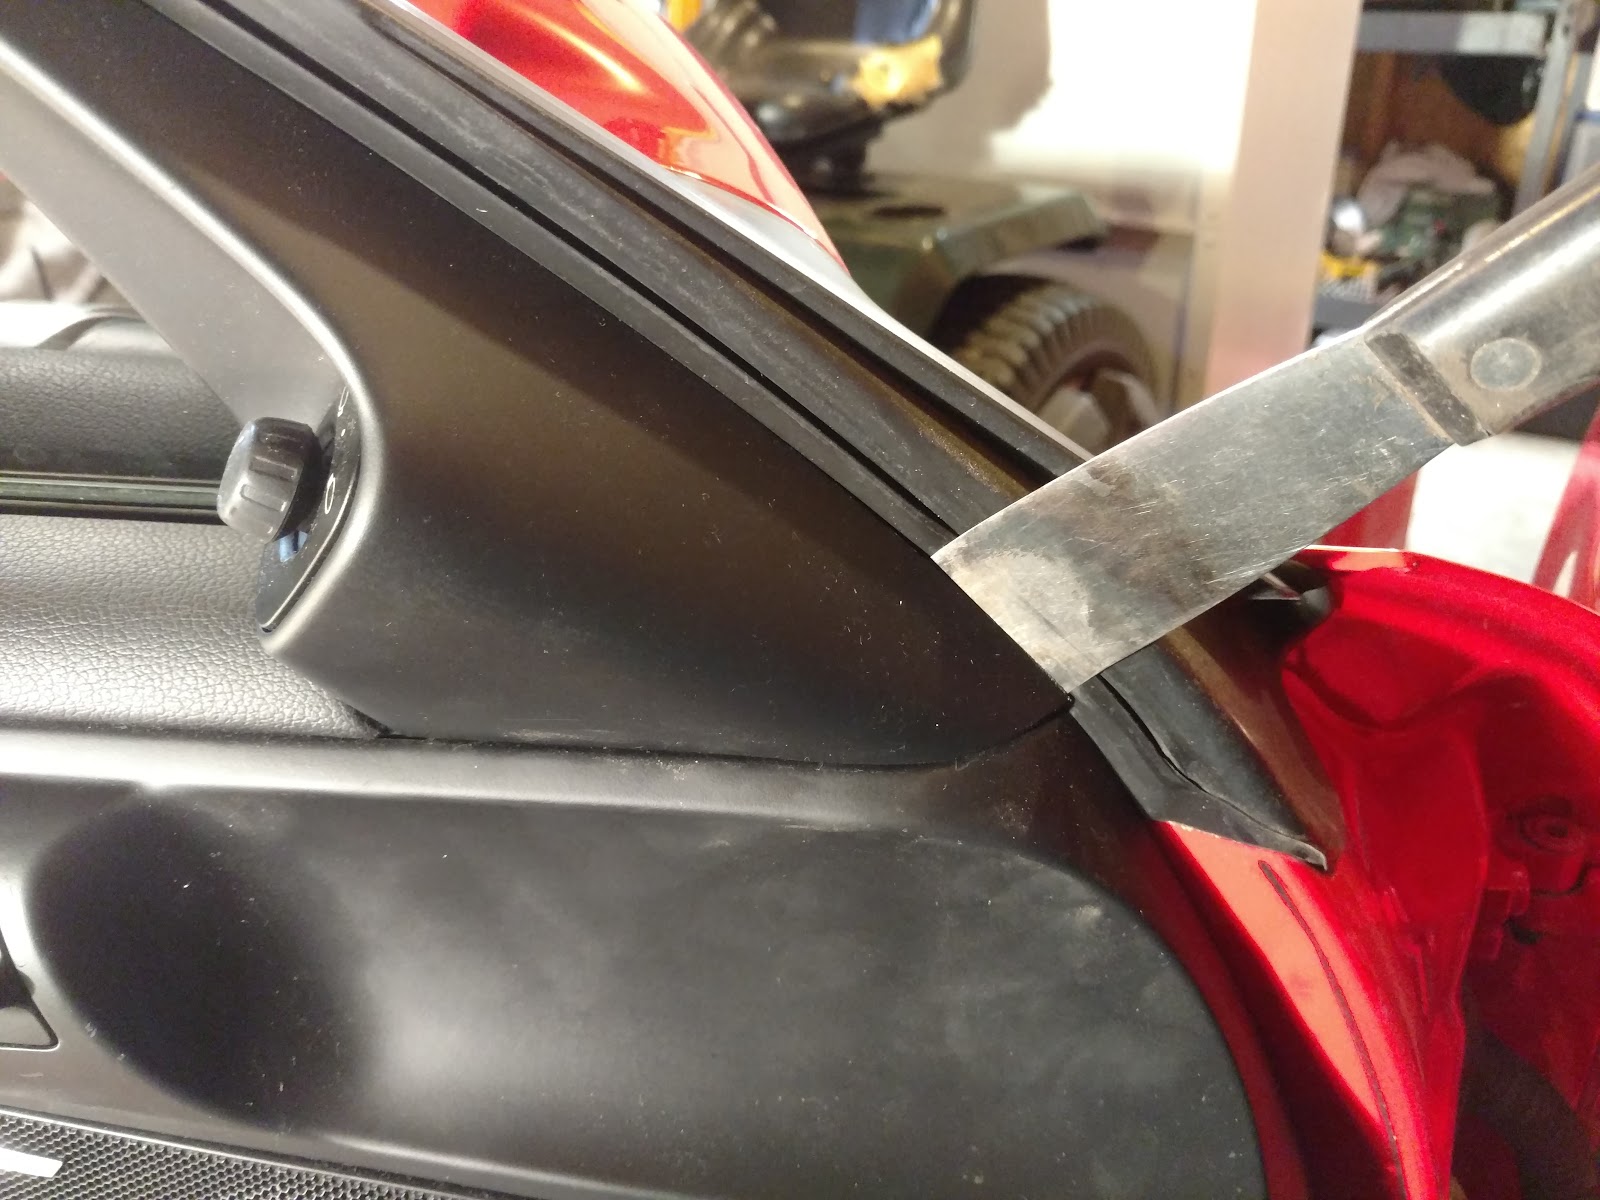
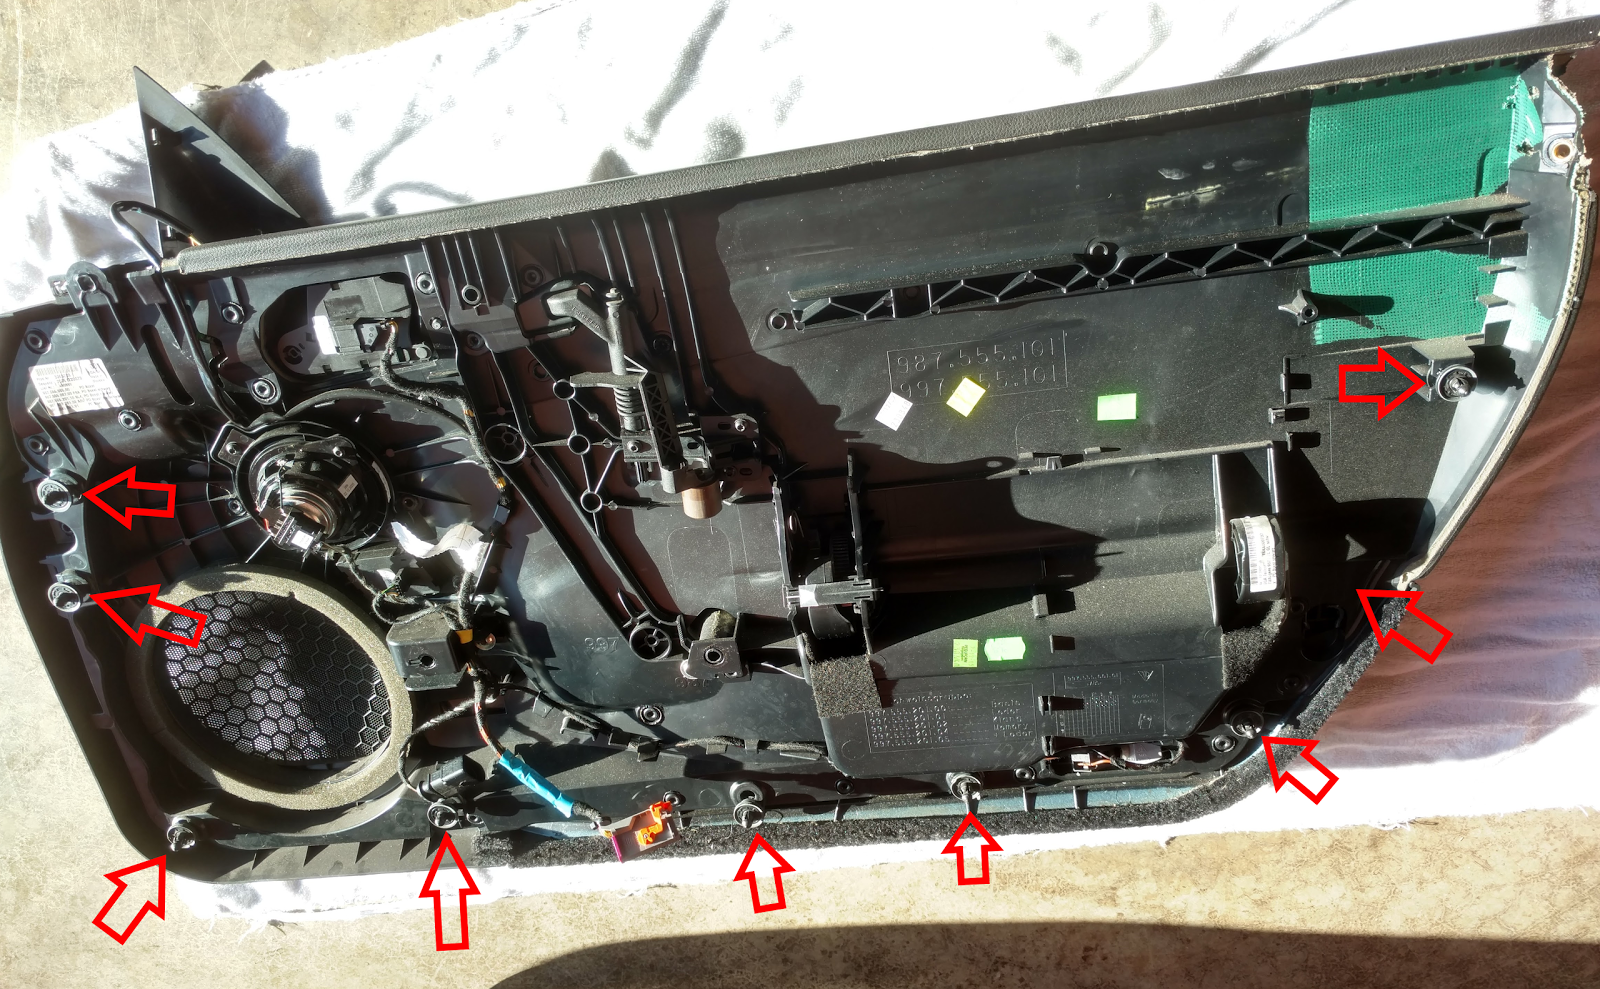
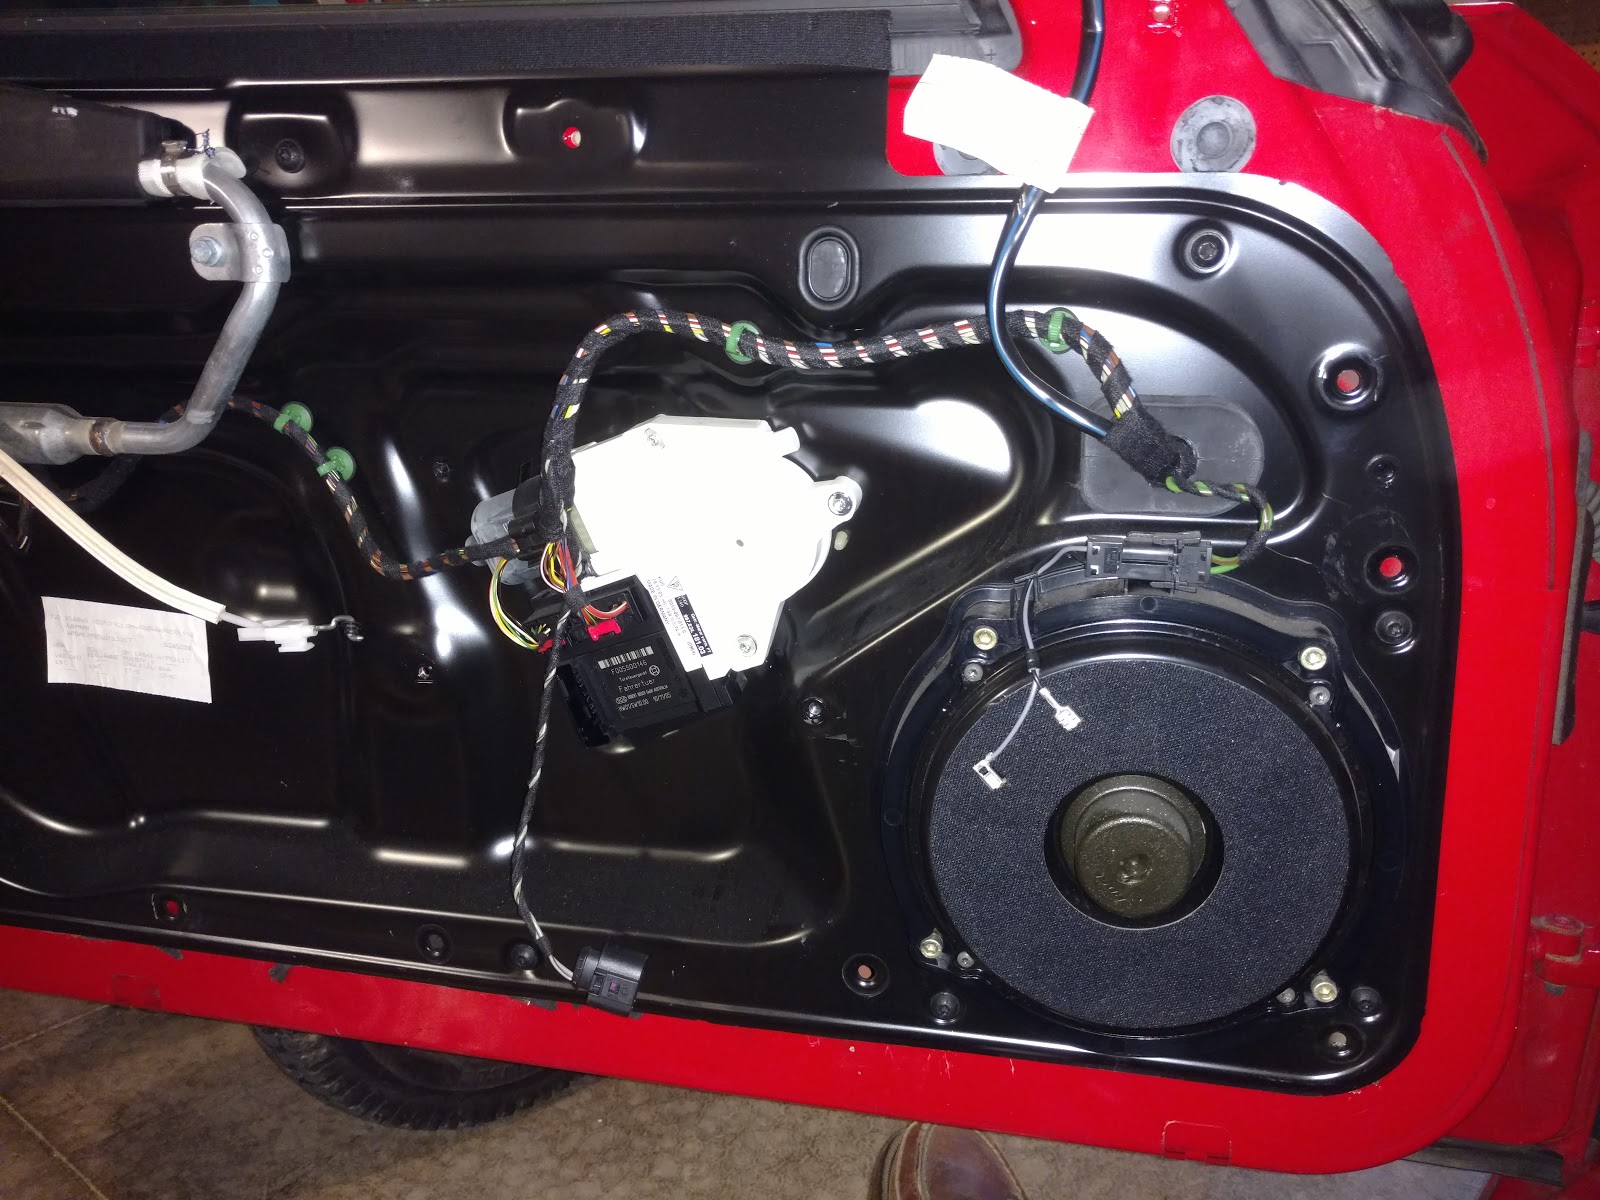
  • Interior rattles.  After 80k of Midwest crappy roads and track days it did develop a couple rattles.  One was around the drivers door speaker which I fixed by removing the door panel and tightening everything up.  Another was with the third brake light assembly in the hatch.  Again, I removed the hatch interior panel and tightened everything up.  Another was in the right rear speaker area, again removing trim, tightening stuff.  
  • Catalyst DTC.  When I bought the car with 60k miles it had a DTC for catalyst efficiency failure.  I addressed this by moving the HEGO for now.  I would like to upgrade to some good headers which will also correct this.  The efficiency fault just means it is not fully catalyzing the exhaust.  It does not cause any other problems.  This is likely doe to a crankcase breather issue causing oil carry-over.  That breather assembly was replaced just before I bought the car.
  • Battery.  Normal cost and easy to change.
  • Hood struts.  Typical cost and easy to change.  
  • Brake light switch.  Typical cost and easy to change.
  • CD Changer failed.  Who cares.  You have a wonderful flat 6!
  • Clean the radiators and install grilles.  Without grilles the radiators collect every leaf and rock they can find.  Mine were probably 50% plugged yet the car did not run hot.  Of course, I cleaned them before I went to the track.  
  • Starter noise.  I just replaced the starter.  It was under $200 for a reman and simple to change.  
  • Weak battery caused the body control to reset to default.  I had to take it to the dealer for an initialization procedure which involves connecting the service tool and enabling the features for the car.  It cost me $70.  Until I had that done my heated seats and garage door opener would not work.

Monday, November 20, 2017

Porsche 987/997 door panel removal


Removing the door panel on cars can be tricky and you often break things.  The are generally attached with an assortment of hidden screws and plastic clips.  I recently removed the drivers door panel on my 2006 Cayman S so I thought I would share some handy info for the next person.

Here are the tools you will need.

  • Torx T30 bit and the proper driver or a long T30
  • Flat blade screwdriver
  • Putty knife

I also had a T30 set which I used for convenience.

Start by removing the trim at the top rear of the door panel and the screw under it.


Then remove the top front panel and the screw under it.  Be careful with this panel.  Pry the bottom edge out and then lift up to remove.  This panel hooks at the top so do not pry on the top.


Now remove the leather trim cover over the door pull handle.  Do this by opening the compartment and prying out on the leather covered trim.

It looks like this with the trim removed.
Now remove the screws at the front and back that are set deeply into the panel.


Now remove the round plastic cover and the screw behind it, both being behind the door latch handle.  You need to hold the handle all the way out to do this.

 This one is best accessed with a shorter torx to ensure you are squarely aligned and don't strip the torx screw or bit.  The tool shown above is not ideal actually.

Next you need to carefully pry the bottom edge of the door panel out releasing the clips.  Here is a photo of the inside of the door panel showing where the plastic clips are.

Unfortunately it seems there is no great way to do this.  Often one or 2 of the clips will not properly release and the panel area holding the clip will break instead.  Plan ahead with some good epoxy to fix the damage.

Once you have the panel disconnected from the door, you need to disconnect the electrical connectors and the door latch cable.


 The door handle cable clips in place with that white plastic cable end.  Start by prying the ends outward away from each other.  Then slide the clip forward until it disengages with the slot.  Once the white plastic cable end is apart from the panel, rotate the cable assembly perpendicular with the hole to disengage the cable.
Be careful with the door latch cable as it does not have much room to work with and you can easily break it.  Depending on options, you may not have all the same connections.

Here is what the inside of the door looks like.


The clips hare 2 piece where the center expands the outer piece when the door panel is pushed in place.  When you pull the door panel, the center is supposed to pull out releasing the clip.  See these 2 clips in the photo below.
Notice the clip on the left is released and the one on the right is still expanded.  They are supposed to release like the one on the left.  If this happens, remove the clip and release it by pressing the center back out.  I used a vice and a hammer for this.

Make sure all 4 tips tuck under the tip properly.  If one is sticking out, push the center in far enough to tuck it back in the then press the center back out fully.

Sunday, October 1, 2017

Porsche Cayman S Brakes

I do track days in my 2006 Porsche Cayman S.  The car is basically stock.  This article is a collection of my thoughts around the topic of brakes.

Pads

When I got the car it had a little over 60k miles on it.  I replaced the brake pads with Hawk HPS.  They seemed OK but not really an improvement over stock.  At Putnam Park and Autobahn I did notice these pads would start to fade when hot so I switched to Hawk Street/Race pads which made a huge difference.  These Street/Race pads are basically race pads that work down to cold temperatures.  They are noisy and create copious amounts of dust like any other race pad so its not something you actually want to drive around with daily but they do work for the street, unlike race only pads.  The nice thing about these is you can swap them in at home and drive to/from the track with them and be safe.  The noise when stopping at times is only somewhat embarrassing but not enough to be worth the hassle of swapping pads at the track.  The stopping power is more than double the stock or HPS pads.  They create far more friction for the same pedal pressure.  So much that it takes some getting used to as the first few times you hit the brakes after swapping them in you are surprised by how hard it stops with such little effort.  Once you get used to driving with them, swapping back to the street pads feels a bit alarming at first.

Tire Rack produced this chart showing the various Hawk brake pads:
Hawk Brake Pad Comparison - Tire Rack

MU is the coefficient of friction, higher means more friction.  More friction means more braking force for a given pedal pressure.  Notice that most race pads do not work well at low temperatures which makes them a problem for street use.  In this case low temperature is often well above ambient.  As you can see some of the pads perform very poorly below 300F.  In addition to the problems at low temperatures, they are generally very noisy and can produce copious amounts of dust too.

Rotors

Most Porsches come from the factory with drilled rotors.  The reason drilled rotors became popular is performance applications decades ago was because of a gas layer that would form at high temperatures cause interference between the pad and rotor.  Modern performance brake pads have significantly reduced this problem, and better solutions have evolved.  One of the problems with drilled rotors is they can crack under the temperatures and stress of track use.  Mine started cracking at Road America which is particularly hard on brakes.  Here is a photo showing the small cracks starting to form.
This rotor is not too bad but those cracks can grow.  In extreme cases, the rotor can break off in chunks which is dangerous.  The best solution for track duty is slotted rotors.  I switched my rotors to Sebro slotted.  This photo shows the slotted version next to the factory rotors.

The slots in the rotors help clear the gas layer but don't tend to crack like the drilled rotors.  The slotted rotors also have more metal mass to absorb more heat.  This will help slow down the heating some under hard braking.  The heat can then be released between corners when the brakes are released.

Cooling

Brakes slow the car down by converting mechanical energy (momentum) into heat.  Changing the momentum of the car requires power (HP).  The engine provides the power to accelerate and the brakes provide the power to decelerate (in conventional powertrains).  Normally the braking power capability is much higher than the engine power.  This is a large amount of energy that the brakes much dump as heat.  The rotors require airflow to facilitate this cooling.  The Cayman/Boxster and 911 sports cars have brake cooling ducts to guide more air to the rotors.  The Porsche GT (GT2, GT3, and GT4) cars have more effective cooling ducts that can be fitted to the other 911 and Cayman/Boxster models.  I installed GT3 cooling ducts on my Cayman S.

Here is a photo of the factory cooling duct.
Here is a comparison of factory versus GT3 cooling ducts.
 Here is the GT3 cooling duct installed.

Brake Hoses

The brake hydraulic system has very high pressures.  Most of the system uses steel allow lines to route the fluid between the brake components.  However, the brake calipers must move relative to the chassis so hoses are required for this part.  Those hoses are generally made of reinforced rubber.  The problem is that even though these hoses are reinforced to reduce expansion, they still do exhibit some expansion under high pressures.  The fix for this is stainless steel hoses.  There are several available in the aftermarket but make sure you use DOT and TUV approved hoses.  

Brake Fluid

Brake fluid is NOT created equal!  Also, good quality fluid with high wet and dry boiling points is very important, especially in a car that will be used on the track.  When driving at speed on the road course, the car will see repeated heavy braking for 25 minutes or more at a time.  This will cause the calipers to heat up.  If the temperature gets high enough, the fluid can boil.  When this happens the boiling displaces fluid in the caliper with gas.  The displaced fluid is pushed back into the master cylinder.  The gas is compressible.  The next time you hit the brakes the pedal goes to the floor with little to no braking at all.  This is a very dangerous situation and must be avoided.  Any decent track inspection checklist will include replacing the brake fluid just before the event, generally within 30 days.  This is a simple procedure and even expensive brake fluid is far cheaper than loosing brakes at the track.  A good DOT 4 brake fluid is Motul 600 or 660 which is available from many parts stores that sell performance products.  There are other high performance brake fluids.  Pay attention to the wet and dry boiling points.  The reason it needs to be changed so often is water will mix with brake fluid, unlike oils.  Humidity and condensation will get into the brake fluid over time.  Vehicles that do not see high brake temperatures are far less likely to have a problem.     

Saturday, March 18, 2017

Porsche Cayman Camera Mount

I bought a Garmin VIRB Ultra 30 action camera for recording in-car video in my 2006 Cayman S (987.1).  This camera uses the same mounts as GoPro cameras and many other action cameras. I found a good windshield suction mount that works great but sometimes its nice to get an in-car perspective.  I searched everywhere for a good mounting system.  I bought a clamp that I could use on the bar behind the seats, on the engine compartment.  However, the clamp was not rigid enough. It was also lower than I would like.
Camera clamp 

I kept searching for better options. I found one for over $400 and it still did not look great.  At this point I decided In would build one.  I went to the hardware store and bought about $35 worth of 3/4" aluminum square tubing, some 8mm all-thread, wingnuts, and washers.  I cut the tube into a 22" and 2, 5" lengths.  I removed the factory bar and installed the all-thread  into the bolt holes the original bar bolts were in.  Here is what I ended up with.


No special tools were needed.  Just a drill and saw.  It seems very rigid.  Road test coming soon.

I plan to just use this for track days and other events.  Its very simple and quick to swap the original bar back in as this camera bar is built for utility, not looks.

Here is a photo taken from the VIRB in the mount.


Wednesday, May 27, 2015

Porsche Cayman S grilles


I have a 2006 Porsche Cayman S.  From the factory there are no grilles for the radiators so they collect leaves, rocks, bugs, everything.  The stuff gets sucked in and has no way out.  This is an issue on the 987 (Cayman/Boxster) and 997 (911). The plastic bars in the openings are plenty big enough for all this trash to get in but not really big enough to get your hand in there to clean it out well.  If you push and struggle, you can reach some of the bigger stuff.  The only way to really clean it out is to remove the nose of the car.

There are aftermarket grilles available.  Most cost around $300.  Some pop on from the outside and others install behind.  After looking at some of these options I decided to just get stainless grille mesh from Amazon and make a set of grilles myself. The grille material comes in a 6" x 36" flat piece which was perfect to make these grilles.  I wanted very good airflow so I selected a mesh with at least 80% open area.  It cost $18.99.  My goal was to keep the larger debris out.

The nose of the car is not that hard to remove really.  However, it is not obvious how to do it either.  You need to read the manual.  There are a few options to get the manual.  You can go to www.nastf.org to get the factory service information for any 1996 or newer car or truck.  The manufacturer works with the government to determine pricing for subscriptions.  In Porsches case, they have a rather undesirable pricing scheme where you can buy $10 access or $100 access.  Of course the stuff you generally want in just over $10 it seems so you have to opt for the $100 access.  Instead, I thought I would give AllDATAdiy a try.  I think it was under $40 for a year of access.  I have used it many times now and while its not as good as the factory info, it works.  Basically there are screws in top, in the wheel wells, and along the bottom you can readily see.  Then there are 2 clips you access from under the front trunk area.  There is also a large wiring harness you disconnect behind the right headlight area and a washer hose behind the left headlight area.  From there you slide the whole thing forward.

Here are some photos showing the nose removed.

Nose removed showing the air ducts over the radiators and condensors


The nose off the car

Looking behond the nose of the car at the air openings


You can see the slot to the right of this headlight where the clips goes behind to hold the nose.


The electrical connector is in here, accessed from the wheel well above the radiator

I had already cleaned most the debris out when this photo was taken. You can still see the leaves packed above the condenser though.


New grille in place, held in with small black zip-ties


After removing the nose and air ducts I loosened the condensers and cleaned the debris from the radiators and condensers.  I also used compressed air to carefully blow back through the radiators and condensers to remove all the smaller debris and bugs while being careful not to bend any of the cooling fins.

Here is what it looks like now.

I actually wanted black grilles but I did not want to use metal that would rust.  Aluminum would have been either too weak or too bulky. I could have painted these grilles, which was my original plan, but I was concerned the paint would not bond well and if they chip you would see the bright stainless under it which would be much worse.  So, I left them unpainted stainless.